26th January 2018 - Australia Day !
One small step for a car, but a giant step for Gidget !
 |
| Happy Australia Day ! |
Happy Australia Day to everyone far and wide ! And we celebrated one day early by getting Gidget off her support (invalid ?) frame, and back onto her new wheels for the first time ! Definitely a momentous day in Australian folklore - Even though it might only be officially recognised as such on July 9th 2019 when she drives into Paris !! But before we could do this, there were unumerable small things that needed work.
 |
| Busy around the rear axle |
In the past 9 months, we (I think I can safely include Ashton in this comment) have learned many facts and lessons along the way, some were kind of expected, but many were not. Rebuilding a 65 year old car will never be simple, and is a hard enough exercise in itself, especially if you are not a Healey specialist, but rather than trying to just rebuild a car, we have actually changed it dramatically - In fact in some instances doing things to the car that have never been done to an Austin Healey before, which has meant we have no firm reference for guidance, just comments and opinions. Gidget is (was ?) a January 1954 build left hand drive BN1Austin Healey 100. Before we even started she was changed to RHD which meant that we started with a bit of a mix of parts. We have then changed the rear axle to a later model 5 stud axle, but we didn't change the brake mechanism and Panhard Rod set-up that
 |
| Engine ready for fitting |
all mount either directly to or around the axle, and this has meant that none of these items fitted properly when we went to put them together - All the mounting points on the axle were at a different angle or position. We have put a new and more efficient radiator core in a redesigned frame so it could be rubber mounted against vibration, but then the updated steering column which again is off a later car would not fit around the radiator. We have put more efficient front dampers on from an MGB, but then these would not fit under the existing body work. We have put later model and stronger front suspension on, but then this doesn't just bolt on to the original car without changes. We have redesigned rear dampers and sumps in ways that have apparently never been done before, which throw up their own setting of interesting issues !! I could go on, but I think you understand - Actually fitting all these lovely new or updated parts to Gidget is an incredibly frustrating exercise
 |
| Original brake fuluid reservoir can |
because absolutely nothing at all just "bolts on". But, we are getting them on, albeit a little more slowly than expected ! An interesting comment was made this week by Steve who is the main mechanic on the car, when he reminded me during one particularly frustrating period that the ONLY parts forward of the fire wall that are original are the block of the engine, the brake reservoir bottle, and the brake master cylinder. In the cabin, the only original item is the dashboard, and in the boot, nothing is original ! Although the outer body panels are original, they have all been so highly modified that they can't truly be called original !! So it is hardly surprising that we have hit a few brick walls along the way.
 |
| Brakes waiting on drums |
But this week has seen us accomplish plenty, especially with our revised deadline of Fenruary 2nd for getting the car out of CCC. First on the agenda were the front brake drums which had caused us a problem last week - Over last weekend, through research on the internet, and conversations with various Healey suppliers and experts in America, Canada, Australia and the UK, we eventually found someone who could supply us with the 4 stud 2 1/4" wide drums that we needed, so we got these ordered and on the way from the UK by air express.
 |
| Welding up the panhard rod bracket |
Meanwhile Andrew started cutting and welding the panhard rod brackets which would not mount up to the revised brackets on the later style rear axle. First he had to weld up the original holes in the bracket so he could redrill them in the correct position without weakening the bracket. Note the position of the 90 degree angle on this bracket for later comment !
In the meantime I had finished the tedious and hazardous work of fitting the exhaust heat shielding
 |
| Pax footwell heatshield |
around the passenger footwell - Tedious because I had to fit spacers down between the heat shield and the bodywork on every bolt and they frequently fall down and have to be retrieved - There needs to be space between the heat shield and the body work for it to perform at its optimum. And hazardous because this material is horrible to work with - The edges are very sharp and when trying to fit spacers etc it cut my arms to pieces. I left blood in suitable spots on the heat shield as proof of my injuries !! I also got the front brakes completely put together, except the drums which are coming from the UK, so we can fit the wheels and move the car on the ground.
 |
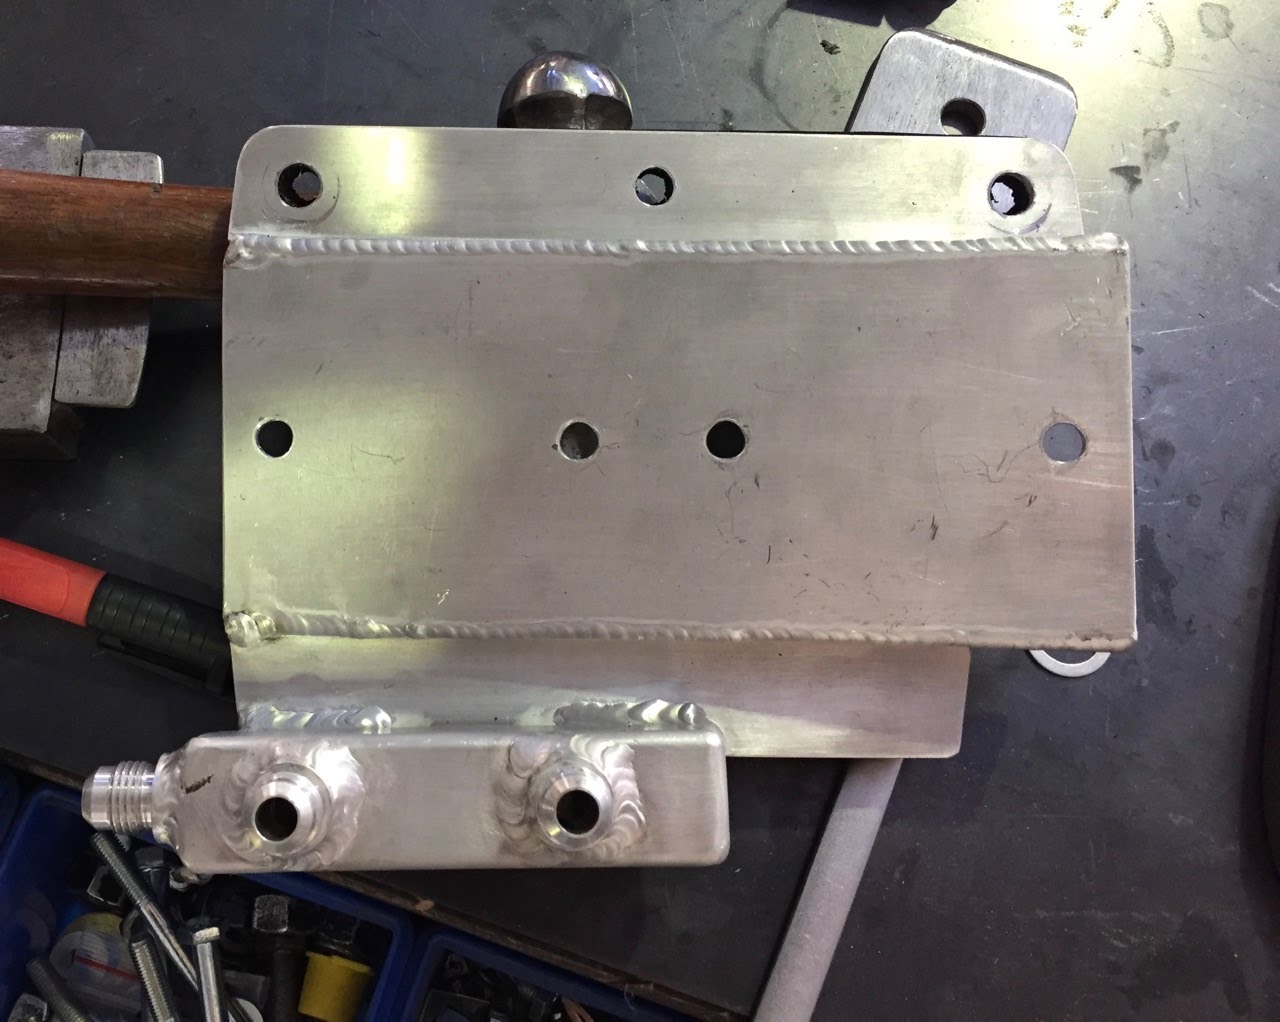
| Fuel pump bracket & manifold |
In between other jobs, Andrew was making up the fuel pump mounting and manifold. Everything we have done to the car has ease of access and repair in mind, and in the case of the fuel pumps and filter it has been made so that just by undoing two bolts and a couple of threaded hose fittings, both pumps can be quickly removed from the car for repair or inspection. Same with the fuel filter. He has done this by providing the pumps with a small manifold from which both (or either) of the pumps suck their fuel, so that there is only a single feed from the tank. While doing this, there were numerous delays because the old style SU fuel pumps have different size / thread fittings than are usually available for hose parts. As a result Andrew had to make up his own fittings by joing two together to make adaptors from one thread to another. Again, time, but it will all make future work on the fuel system so much easier, especially in remote locations.
 |
| Shade in driveway |
Meanwhile, back at my house, I was preparing for Gidget's
 |
| Cooler outside garage too |
imminent arrival ! My double garage is full of cars, and outside the garage it is hot, especially in summer, with no protection from the sun (or hail in Queensland thunderstorms !) So we have erected shade sails out over the driveway, which will enable me to put a car outside so Gidget can be undercover inside, while simultaneously providing a shaded outside area for dusty work like preparing Gidget for painting.
 |
| Batteries - Too big ! |
With the battery location around the rear axle now ready, and wiring installation started, it was time to look for a suitable battery. First of all, space is limited due to the fact that the car originally came with 2 six volt batteries, which are smaller than the 12 volt battery now fitted. The battery that came with Gidget is some 26 cms long, and as the space in the back is only 23 cms max, we are not sure how they ever fitted it ! I found one of similar CCA at Battery World that is 24 cms long, but even that is a bit tight, so the search continues. We are also considering a Gel or AGM (absorbent glass mat) battery for which there are many pros and cons - Not the least that they are much more vibration resistant. The search for the ideal solution that will still fit in the space will continue.......
 |
| Wiring goes in |
On Tuesday this week, Steve and I stayed late to work on the wiring, with the idea that we would get more done if we were not disturbed at all. This worked quite well, although the issues raised by adapting an older style qiring loom to modern requirements soon became evident. This has nothing at sll to do with the age or the quailty of the wiring, but more to do with how it used to be done. In a modern car we have lots of fuses for everything, whereas the system in old cars, including the Healey, is that there were only 2 fuses, and everything was wired in loops so that it all passed through these two fuses ! Because we want to add separate fuses for most items so that we can more easily
 |
| Its easier with no panels on |
pinpoint a problem, we have to rewire much of the car in order to separate these circuits. Buying a "new" loom would not resolve the issue, because most off the shelf looms for older cars are made in the same format as the originals - Mainly because that is what most people want - Originality. Of course, this will not suit us, so the rewiring of Gidget is very much a bespoke item, tailored specifically to the car and our requirements. Once again, the advantage of doing all this work in-house at CCC becomes apparent because when work has to stop while waiting on parts for wiring, work can continue on installing engines or gearboxes or amending the bodywork. So we made some progress before we called it a day at about 9.30 pm. with the loom installed, bus bars and fuse boxes mounted, and a better idea of what we needed overall. Next is a shop for switches and relays so we can put it all together.
 |
| Fuel lines & wiring from boot into cabin |
As the rear fuel pump mounting came together, the fuel line was located up to the rear fire wall and into the cabin. Once in the cabin, a steel line will be run through the cabin to the front fire wall before it returns to flex line which will run to the carbs. But at no point will the fuel line travel underneath the car where it could be exposed to potential damage. The same is true with the electrical wires - The main part of the wiring (fuse boxes etc) have all been moved inside the cabin, high up on the firewall, in order to protect them from engine heat and water ingress during river crossings. The wires to the back of the car then follow the fuel line on the pax side of the car, up into the boot for the fuel
 |
| Fuel lines & wiring in boot |
pumps and rear lights. On the driver's side we will run the brake line and the main battery cable to the solenoid and starter motor. So the wires for the boot are now mounted through the rear fire wall, and the only thing that needs to be adjusted is the length of the wires to and from their new positions. The fuel tank guage is now wired up so we can install the auxillary tank for the final time and be plumbed in, so we can finish off in the boot.
 |
| Hmmm, Nice car ! |
As an aside, Steve has been working on a beautiful replica C Type Jaguar for a few weks, and finally completed it on Wednesday. Before it was collected, he had to go for a test drive to test his work, and it surely was a beautiful site to see him heading out of the yard ! And yes, he did have a big grin on his face !!
 |
| Revised anhard rod bracket |
Meanwhile, back in Healey Land, the panhard rod was being a pain. With the bolt holes in the bracket now matching the bracket on the axle, we bolted it all up - But the rod was hard up against the diff housing, and there was no way it was going to work - Another case of fixing older parts to newer ones ! After considerable measuring and checking, we decided that just by cutting the 90 degree angle off the bracket and then welding it back on the other way round, we should get anough clearance from the diff housing. We also had to be very careful of the brake rods which run right across the car in the same area, and were also being a problem ! I have circled the bracket, and if you compare this to the earlier photo of Andrew welding the bracket up, you can see the difference. Once it was alll welded up, undercoated, and painted, we fitted it up, and it worked perfectly !
 |
| Lengthening brake rods |
Then it was on to the steel brake rods which needed to be cut, rotated and lengthened in order to fit onto the brake levers which were at a totally different angle on the newer axle. Once again, it was time consuming and fiddly work, not helped by the close proximity of the panhard rod, handbrake cables, and dampers and their linkages. It is very tight back there, and everything has to be able to move freely at all points in the suspension travel - Not easy when the car is not sitting on its suspension but is suspended in its cradle where it has been for the past 9 months ! Eventually
 |
| Finished brake rod installed |
all the brake rods were adapted - The shorter one lengthened by Andrew welding in a similar bolt, which he then cut to the correct length so it all fitted perfectly. Once fitted up, the entire linkage was taken apart and all the fittings greased, the felt washers (yes, felt washers !) inserted (incredibly fiddly) and the cotter pins and split pins installed. Job done.
 |
| Truck sticker !! |
 |
| Council truck |
On the way home that night, I pulled up at a set of lights next to a Council truck. I couldn't believe it - A big sticker on the side showing (pictorially and in writing) the correct way to get in and to get out of the cab !!!!! You have got to be kidding - People need instruction on how to get a truck now ? I fear for future generations if they can't even work that out !!
 |
| New timing chain cover |
Finally, on Wednesday evening, our timing chain cover arrived from the UK - With that fitted we would now be able to put the engine and gearbox back into the car ! On the way home that night I deviated to the outdoors shop Anaconda to check on a couple of things. I have always used Micropur liquid for water purification, because you need a lot less of it than the tablets. I used it all round the world for 2 1/2 years in Troopie,
 |
| Water purifier |
and still have some of the original 100 ml bottle left. We will be able to carry just a few ccs in a dropper bottle in Gidget. I also checked the Life Straw drinking bottles - These have an inbuilt filter so every sip you take is filtered. And if you think micropur AND these bottles are both not required, then you have never had "an urgent need" in the middle of nowhere ! Diarrhoea is something to be avoided at all costs on a trip like this, and I will be filtering and treating my water and peeling my fruit every step of the way !!
On Wednesday afternoon, Mark Buchanan from Leaded magazine came over. Mark produces this excellent magazine about Sports and Classic Cars, and I had contacted him about our project. As he was in the area this week, he dropped in to the CCC workshop to meet us all and check out the project, and hopefully we can put together some articles about it all for future editions. "Watch this space", as they say !!
http://www.marquephotography.com.au/leaded-as-in-the-fuel
 |
| Timing chain cover in place |
On Thursday we fitted the new timing chain cover, taking the executive decision to leave it matt black as it came from the supplier, rather than delaying everything by 24 hours while we painted it. Then, at 12.36 pm, a hoist became free in the main workshop. In order to fit the engine and gearbox we had to get Gidget off her workframe, because once the engine was in we would never get to move her ! So Steve and Mark wheeled her across the yard, and onto the hoist, and at 12.42 pm, her wheels hit the ground for the first time, and she was wheeled out back to the bodywork shop. It was a great moment to see her rolling
 |
| Heading in to the hoist |
down the road, with her beautiful new leather covered Moto Lita steering wheel enabling her to be steered with ease (and comfort) !
Unfortunately the euphoria was shortlived, as once back in the bodywork area, she had to be jacked up on axle stands and the wheels removed so we could continue working on her.
Out of interest, when she "touched ground" for the first time, I watched very carefully to see how much the springs sagged - I now there is no engine in her yet, but I thought they might at least bounce a little ! Nothing. Hmmm, I hope she is not going to be too firm !!!
 |
| Video of the great moment !!! |
 |
| 8 1/2" clearance |
One thing I did do before she was back on axle stands was to measure ground clearance. 8 1/2 inches in the middle from the main chassis member, and 8 inches below the bottom of the sump. Thats a massive 20 cms, and considering I only had 10 cms on my Lotus when I went up the Ice Trucker's Highway, I feel quietly confident that we may survive the rigours of the Gobi, at least clearance wise.
After eyeing up the engine, we took it off the engine stand and onto the floor so we could fit the rear crank seal, and then fit the gearbox, before installing it all as a unit into the chassis. The rear seal is an updated version that supposedly reduces (or even eliminates ?) oil leaks, so we feel it is a worthwhile upgrade. At this point Steve went to get the small brass bushing out of the old crankshaft, that matches up with the shaft on the Celica gearbox - Normally a simple 5 minute exercise that involves hydrualicking it out by packing it with grease, then using a drift into the grease. An hour later, with much help and input
 |
| Rear engine seal in place |
from everyone available, the bushing hadn't moved ! Gidget throws up yet another obstacle ! And this part is not something you can buy just anywhere - It is a unique part suited only to the Healey cranskshaft and the Celica gearbox shaft, and no one had ever suspected that it might cause a problem ! So, with Friday Australia Day holiday looming, we were left to ponder the fact that we might have to get a new bushing milled to spec next week, unless Steve can think of a solution in the meantime !
 |
| Foam on back of aux tank |
As a result, the rest of the afternoon was spent working on the wiring, getting rubber grommets in place, fixing foam to the back of the auxiliary tank to prevent it rubbing directly on the boot panels. and going to the auto-electrics store to buy switches and other parts needed for the wiring.
Overall, a second consecutive short week, due this time to the Australia Day holiday, but one in which we not only got quite a lot finished, but also passed the milestone of getting Gidget back on her own wheels for the first time. It has also been an incredibly busy and tiring week with early starts, late finishes, and hot humid weather that saps your
 |
| On her wheels at last ! |
energy even when standing still !! But we made it. We now only have next week to get all major welding and bodywork essentially finished so we can take her back to my garage so we can start on preparing the body work for painting, and on getting all the interior trim installed. Will we make it in time ? Check in this time next week to find out !
Rest of the pics are here :-
https://photos.app.goo.gl/m7wxyOBh9nUhu0f93


No comments:
Post a Comment
Ashton & Giles welcome any visitors, support, and comments as we prepare for our Adventure !