4th Nov 2017
Time to see if the wiring is OK !!
 |
| The wiring loom on my table |
I have always disliked electricity - Perhaps because as a small boy I still very clearly remember sticking my finger into a home light socket to see what those two brass pins were........! Only ever did it once ! I have done quite a lot of wiring for various cars over the years - spotlights, radios, and even fitting voltmeters etc in Troopie - When it is straightforward I don't have a problem. But when wiring systems get complicated with wires seemingly going all over the place, or when I need to track a wiring problem, then I tend to defer to an expert. As far as Gidget is concerned, it was time to delve deeper into the mass of wiring that were sitting in a box in the corner of my garage, and work out if everything (anything ?) was serviceable.
Wiring in finished car is not the most exciting thing - It doesn't make any nice noises, or do anything visually very obvious, yet it is probbly one of the most important items on the car - Without it, and unless it is working perfectly, you are going no where ! And so now, with Gidget's wiring, this is not the most exciting thing to work on, to write about, or even to read about. But it remains so very important, and therefore I shall persevere - As hope all readers will also !!
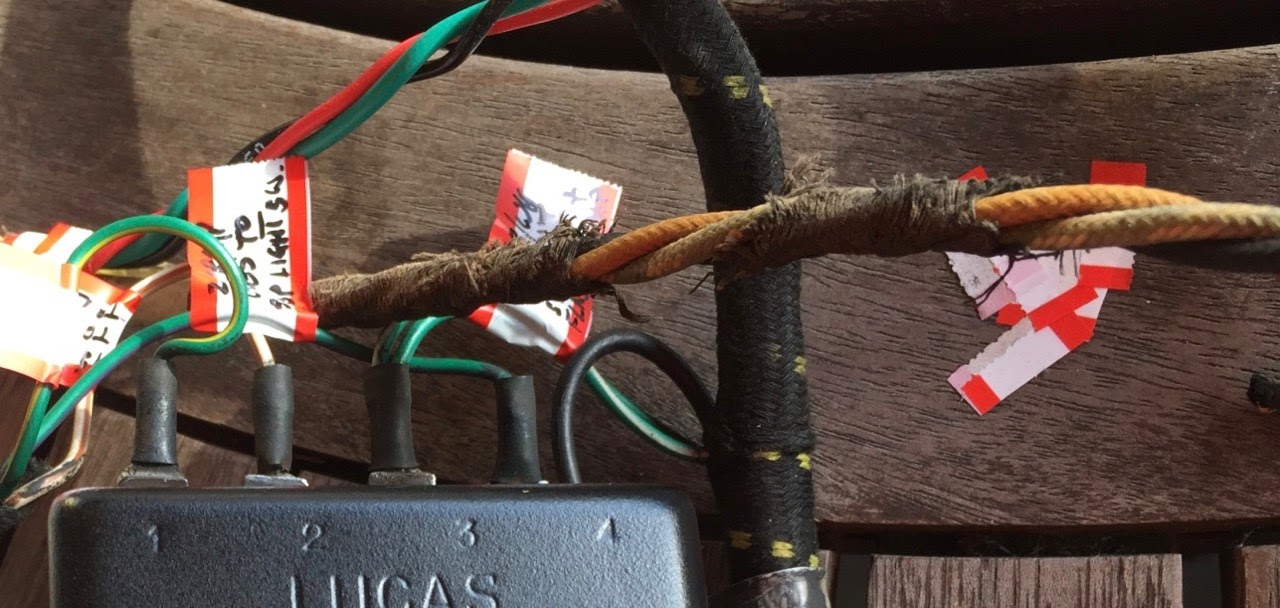
 |
| Only 2 fuses in a Healey ! |
If I make it sound like I haven't touched the wiring yet, and you think that I have left it all a bit late, then that is not quite correct. I actually started to do some remedial work on the loom when it was still in the car several months ago, back when I still thought I was just going to be doing minor repairs !! I had then removed all the wiring from the boot (rear lights, fuel tank sender, fuel pumps etc), labelling everything of course, and also removed all the main battery cables. But then a few weeks ago, while I was last down in Victoria, I returned to find the engine and gearbox out of the car, and the whole wiring loom in a box on the floor ! Luckily they had labelled a few of the main bundles of wiring before they removed the dashboard, but even so, this big and untidy mess of wiring was pretty daunting when I first took it out for an inspection. So after a while trying to puzzle things out, I put it back in the box !!
 |
| Original brittle, faded wires included in newer loom |
But I knew it needed attention, and my mind was working on it even though my hands were not ! Ashton and I discussed at length whether the current loom was OK, or whether we should buy a brand new one. The main loom on the car is NOT original - My guess is that it was probably put in when the car was converted to RHD, whenever that was. But the wiring and the braided cotton covering was largely in good clean condition, although the section that ran under the car and had therefore been exposed to the elements were a bit grubby. The real problem, and one that was somewhat unbelievable, was that the wiring extensions that go to the head lights, side lights, and much of the wiring into the boot, were all made up using the original 1954 wires !! Or maybe after everything else we have found in this car, that it is perhaps not so unbelievable ! But this meant that if you looked at the wiring superficially, all you saw was all the old wires, and immediately feared the worst.
We decided on a new loom - But then found out that it was a 2-3 month lead time before they could even start to make one for us, so our mind was made up - We will work with what we have. So I started to read about auto-wiring, and connectors, and switches, and all the other aspects of auto-electrics. I talked to people - the guys at CCC, Healey Club people at Healey gatherings, electricians - Anyone who had an opinion on things eletric. In the meantime the starter had been refurbished and checked over by Nerang Auto Electrical, I had bought a new 65 Amp Bosch alternator to replace the indeterminate age Lucas one, a new coil purchased (with a spare for the trip). Which are the best wiring connectors, bullet or spade ? Soldering. How do I best waterproof them ? I printed out Healey wiring diagrams and tried to study them. What size / colour wire ? I read copiously about (Lucas) wiring protocol for 1950's British vehicles - This is not a simple subject for me !
 |
| Everything laid out again |
Then I got the wiring loom out of the box again, and laid it all out on the table at home (helped by the fact that my wife was in hospital for a couple of weeks having a new knee inserted !). I bought labelling tape and good pens. I got out my multimeter and put new batteries in it. Then I sat down at the table and basically spent a week non-stop testing every wire, every connection, working out which wire went where, undoing connections to check for corrosion, and referring everything to the wiring diagram from the Healey workshop manual. I took apart the relays and regulators and cleaned everything up. And believe it or not, it slowly all started to make sense. Certain colour wires
 |
| Refurbished flasher relay unit |
are always used for the same thing - The most obvious being black for earth. The more time you spend on it, the clearer the pattern becomes, and while I still have a long way to go, progress is being made ! I will be visiting a Classic Vehicle wiring specialist in 10 days time, and now have a list of specific questions to ask him, like if the Alternator has a built in voltage regulator, why do I need a separate 1950's regulator ? If I take it out, what do I do with the wires ? Can I upgrade the old style flasher relay and use modern relays ? Long way to go, but I feel confident we are getting there.
 |
| Andrew on his English Wheel |
Meanwhile, while I was struggling with the wiring, CCC were progressing with the many small remaining parts of the chassis trying to get everything finished to the point we can paint the interior of the car - The engine bay, the cabin, and the inside of the boot. We are so close to being finished, but there is always a small issue to be resolved at every turn. We go to weld the inner guard to the end of the outer chassis rail, and the inner guard turns out to be a mass of rust holes. So Andrew makes up a small new section on his English Wheel and it is duly welded in - But instead of a 10 minute job, it turns into a 2 hour job. The new radiator mounts are all set up and welded in place, to use rubber
 |
| Exhaust route and jack point |
bushes in compression to enable the chassis to flex without breaking the radiator. The new dampers have arrived from the USA after 4 months, and we have decided to use the slightly larger MGB front units (with A Healey arms in order to maintain the geometry) - But to fit them we have had to cut out part of the inner guard, and add reinforcing to maintain the strength. The jacking points have all been reinforced, especially the one near the exhaust route, the final floor panels welded in place, and the boot lid and boot apron have been hammered and stretched and worked until they actually fit. We have to get the shape right because there are several internal brackets and supports for the rear of the boot that are very important due to the weight that will be in the boot - Everything has to
 |
| New damper surround |
be tied to the chassis properly for strength. And these brackets and panels do not fit unless the boot shape is very close to correct. But at last the boot lid now closes onto the rear shround pretty well, so the internal brackets and supports can be welded in place. Quite a lot of bog will be needed on the rear panel before it can be painted, but that is just what we are forced to do.
As always, things just take longer as you near the end, and after hoping to be there last week, we are now, as I write this, just about there, and I expect the car to be in for painting this Monday, so we can then start putting everything back together. I am away in Victoria for Targa High Country around Mt Buller - Ashton and I are
 |
| Inner guard tied to outer sill |
competing in his S1 Elise so we can hone our navigational and team skills in preparation for Peking 2019 ! When I come back on the 14th November, it will be full time putting everything back together - Including the wiring loom !!
 |
| Rear boot shroud |
Finally, the engine repair is proceeding. The block is currently being line bored to ensure that everything is right for the new crankshaft, camshaft etc. Once this is done, and the block cleaned, Steve at CCC will start putting the engine together. The head has passed its pressure test, and I will bring it back with me from Victoria, by which time all the rockers and valves etc will have arrived, and that can be put together in preparation for returning it to the car.
We have turned the corner and are proceeding at full speed - I still intend to have the car running by Christmas ! Back to more exciting subjects shortly !
Rest of the pics are here.
https://photos.app.goo.gl/UlWGTSj8mGhAJmnz2


Rather you than me fella! But thank you for persevering! Looking forward to the weekend after next - and a painted chassis :)
ReplyDelete