19th - 23rd February
Some things just aren't much fun !
 |
| Moving everything back home |
 |
| New itg air filter arrives |
Having got Gidget back to my garage last week, there were a million and one things to do. There are just so many parts that have either come off the car and are worth saving as spares, or others that are still to go back on to it, that I hardly have a room to put everything. Even moving everything back from CCC to the house meant several trips in Troopie, with the back and the
passenger seat packed full ! And parts were still arriving from suppliers - in this instance the new itg foam air filter which fits perfectly into the limted space available. We ordered it with an un-cut backing plate so we could ensure it fitted our set up perfectly. Eventually fitted everything in somehow, and started to get on with the work.
 |
| Starting on the louvred bonnet |
First thing was to start getting some of the green enamel paint off, and I started with possibly the worst piece - the louvred alloy bonnet. This paint is HORRIBLE !! Using paint stripper, it just turns the green into a gooey mess, almost like slime, and the stripper doesn't penetrate past the green mess ! A second coat of stripper gets down to a brown layer of paint, then another coat gets down through the grey coat, and in most areas down to the
 |
| Inside of the bonnet |
metal, although some places have even more layers of paint ! Its not exciting, its not interesting - Basically doing this is just a repetitive slog, and getting through this means you really have to just put your head down and get on with it. I think you get my point !
The louvres meant it was also pretty fiddly and time consuming to work
 |
| Holes in support struts |

around them. Meanwhile green slime was going everywhere - and anywhere it landed (like on the garage floor) of course that paint came off as well - Whoops !! Big sheet of plastic laid on the floor helped to solve that before it got too bad ! And once I got to the inside, there was another issue - There are two steel support struts and are welded into the bonnet for strength, and they have multiple holes in them for lightness. But the old green paint is down inside those holes where it
is almost impossible to reach, and short of undoing all the welds and deconstucting the bonnet completely, there is no way of completely getting it clean in there. So I just did my best and kept picking out bits of paint whenever I could. Eventually got it all stripped, and using a powerful water hose managed to get a lot of the rubbish out from under the struts - All good !
 |
| Boot lid |
Moved on to the steel boot - Again just a repetitive, mindless
operation of scraping and cleaning, and eventually got that all cleaned up. The boot lid has suffered quite a lot of accident damage in the past, and there are numerous scars and dents and patches in it which will need to be re-repaired before final
 |
| Old damage to boot |
painting. Also quite a lot of rust around the edges of the boot lid which will need some attention.
Then I had to mark out the front RH wing as it hadn't quite got completed before I brought the car home, so I had to mark out where the jack slot and the ventilation vent were to go, then return it to Andrew for completion. I also marked out the air filter backing plate so Andrew could cut it out on the drill press in the CCC workshop.
 |
| Daryl put to work |
 |
| Inside of the bonnet |
On Tuesday Daryl, a good friend from Lotus Club Qld, came down for the day to help, and after a quick visit to Super Cheap to get some more stripper, rubber gloves, paint, and to inspect battery boxes (of which more later), followed by a coffee, it was time to do some work ! We set up one of our panel beater's trestles in the garage for sanding and rust treatment, and the other trestle out in the garden so we could spray paint (from cans) without it covering everything inside. First job was to etch prime the steel support braces on the alloy bonnet to stop them rusting in Queenslands humid environment,
 |
| Preparing to paint the boot |
so quite a lot of masking was required. Once completed, we tackled the boot lid, first working on the rust around the edges. After acid treating, I painted just the edges with POR15, and will later on cover that with primer so it can eventually be painted body colour. And after acid treating and sanding the rust spots, and cleaning them up and degreaing them properly, we painted it all.
After painting the inside of the front wing with POR15 for longer
 |
| POR15 inside rear wing |
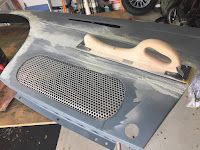
term rust protection, we turned to the outside, and repeated the acid treatment before priming it - All looking good. Then we repeated the operation on the rear wing and did the same thing - Once again all looking so much better than the rusty items that I had been looking at for the past few days. I then turned to the ventilation grills that cover the side exhaust, which we have decided to paint semi-gloss silver, and used VHT paint which is supposedly good up to more than 700 deg C, and will hopefully survive the heat generated down in that part of the car.
 |
| Silver cooling vents |
The next morning, first item was the pax door. This is largely new becuase it was the one that was cut down to accomodate the side exhaust. But it was becoming very rusty and the easiest way to deal with it was to remove it - Trouble was, one of the screws was incredibly tight all the way, and I was worried it might be crossed or stripping, so it was an hour before I could get the door off - Eventually all done.
 |
| Door eventually removed |
There was also still some residual green paint on the door jam
 |
| Green paint on door jamb |
 |
| Bog on the front guard |
 |
| Bog around the headlight surround |
which had to be removed, and the inside panelling needs a bit of attention. However, I decided to start on the bog on the the front and rear LH side guards - I haven't used this stuff since I repaired my 1956 small window VW Beetle when I was a student, but as soon as I opened the can, the smell brought back a myriad of memories ! Once I was over the remeniscing, I mixed some up with the hardener and got to work. There was nothing major - Much of the imperfections were where new panels had been let in to the guards, but sometimes the small imperfections are harder to repair well than the major ones ! Nevertheless progress was made, if slowly. The true imperfections only show up properly when they are covered in primer, so it was a case of bog, sand, paint, bog, sand, paint, etc etc for most of the day. I split the work between the three panels and the exhaust cover so that I could rotate the panels and keep working on one while another hardened.
 |
| Winno put to work |
Winno arrived about 9 am, looking for a cup of coffee ! Just as he was settling down in the kitchen to drink his coffee, I told him to bring it to the garage so we could get to work ! That pax door was looking in need of TLC so I set Winno up with a pair of rubber gloves and the paint stripper, and left him to it, while I continued with the bog and sanding.
 |
| New pulley (L) compared to original |
Mid morning saw the arrival of the UPS van with its delivery of the new water pump pulley from the UK. I opened it in trepidation since the last one was the wrong size, but all turned out to be more than good. Not only was the pulley size correct, but additionally the whole item was considerably "thinner" than the original, which means we have some more space of about 1 - 1.5 cms between the fan and the radiator, which can only be good. Now this can be fitted, then the radiator bolted in and plumbed up, and then the alternator bracket can be finalized so the three pulleys can be lined up accurately.
 |
| Windscreen stored under the bed |
Between painting, stripping, de-rusting, bogging, and talking, we got a reasonable amount done by lunchtime, after which I had to take off to pick up the windscreen which had been having its anti-rock ClearPlex protection film added to the new windscreen glass. No photos as it is invisible, and since it was all wrapped in bubble wrap, it stayed that way and was just stored under my bed until required !
 |
| Bogging, sanding, & painting |
The rest of the afternoon was spent bogging, sanding and painting - As you have probably guessed !
 |
| Alloy sill covers adapted to fit |
The next day, a major "rain event" set in, and we went from hot steamy sushine to torrential rain, and this made it impossible to spray paint not only due to the high humidity, but more so because I couldn't go outside, and spray painting inside is just not on. So I moved on to all the many other things, first of which was the passenger door sill. The Healey has a kind of patterned alloy door sill cover that we would like to maintain, and while we have already reshaped the B pillar one, but the sill is now a totally different shape. With careful hammering and shaping, I was able to get it to fit, and now all it needs is a neat fold along one side so it will fit properly when the other panels are added.
 |
| Measuring & cutting the new carpet |
Meanwhile, as the rain continued, I started on the interior carpeting. The original carpeting was thick and quite heavy material that was glued in place. 60 years of wear and tear, as well as removal when repairs were done in the past, had left it in poor condition. With modern materials available now, thin marine carpet is not only lighter but also behaves better when it gets wet, so we are using this. First of all, having removed the switch box (using the quick release electrical clips fitted by Steve), I covered
 |
| New jack in use |
the transmission tunnel, and then, after removing the seat, the passenger side floor. (To remove the seat, I had to use the new jack system we had installed, and I am pleased to say it worked really well, lifting both wheels clear of the ground with little effort.) The floor has the fuel and electrical lines running along it, so these had to be removed to slip the carpet underneath.
 |
| Heatshielding for inside footwell |
 |
| Heat shield in place |
I then moved on to the rear paneling, and although it was pretty fiddly
around the curved bits, it all came together really well and looks great, making the interior a much more pleasant place to sit for 36 days, while also being a lot lighter than all the previous material. While doing the passenger footwell I also fitted some additional foam heat shield by gluing together some offcuts, and fitted the finished piece down in the footwell before covering it with carpet.
 |
| Fire ext on switch box |
 |
| Checking that I can reach ext. |
While I had the switch box out, I measured up a 1 kg fire extinguisher (of
which we are required to carry two) not only to see if they would fit on the top, but also to check if we could reach them when fully harnessed in our seats - Answer yes. So will purchase a couple this week and mount them to the box before refitting it, hopefully for the last time ! I am getting tired of putting things on only to have to take them off again later !
 |
| Weld repair before bog |
 |
| Weld repair with bog |
Lastly, because the rain started to let up a bit, I applied some bog over the
major weld repairs that had been done on the alloy front shroud. Most of the shroud is in pretty good condition, but just these 2 or 3 places need a bit of work. I will be taking the shroud off shortly (too dusty to sand it while on the car) so decided to put the bog in now to save time later.
And for this week, that was it. Lots achieved, mostly small stuff, but all needing to be done. I will get Steve to come over one day next week so we can hopefully fit the engine up and get it started. I will be buying the oils this week, and filling everything up in readiness. Hopefully a couple more weeks should see us mobile..............
Rest of the pics are here :-
https://photos.app.goo.gl/IR0GPzNH00ReTkoO2


 around them. Meanwhile green slime was going everywhere - and anywhere it landed (like on the garage floor) of course that paint came off as well - Whoops !! Big sheet of plastic laid on the floor helped to solve that before it got too bad ! And once I got to the inside, there was another issue - There are two steel support struts and are welded into the bonnet for strength, and they have multiple holes in them for lightness. But the old green paint is down inside those holes where it


I feel your pain with nothing ever being the 10 minute job planned. I'm at about the same stage as you restoring a BN1. When I go out on the car for an hour my wife always asks if that is Healey hours or the shorter normal type.
ReplyDeleteI've just read this blog end to end this morning and one thing jumped out at me. You make no mention of fitting a colapsible steering column. Is thus something you considered?
Considered, but not done. Potentially it would have delayed us, but in hindsight we would have had time ! Maybe during next rebuild......?
ReplyDeleteThis comment has been removed by a blog administrator.
ReplyDeleteThis comment has been removed by a blog administrator.
ReplyDeleteThis comment has been removed by a blog administrator.
ReplyDeleteThis comment has been removed by a blog administrator.
ReplyDelete